Setup Guide
How To Set Up Your ZapComm Account
Follow these steps to go from invitation code to your first WhatsApp sale. This guide follows the actual portal flow: invitation signup, assistant setup, WhatsApp, PIX, product, Instagram, Conversations, FAQ, sales, payouts, and private groups.
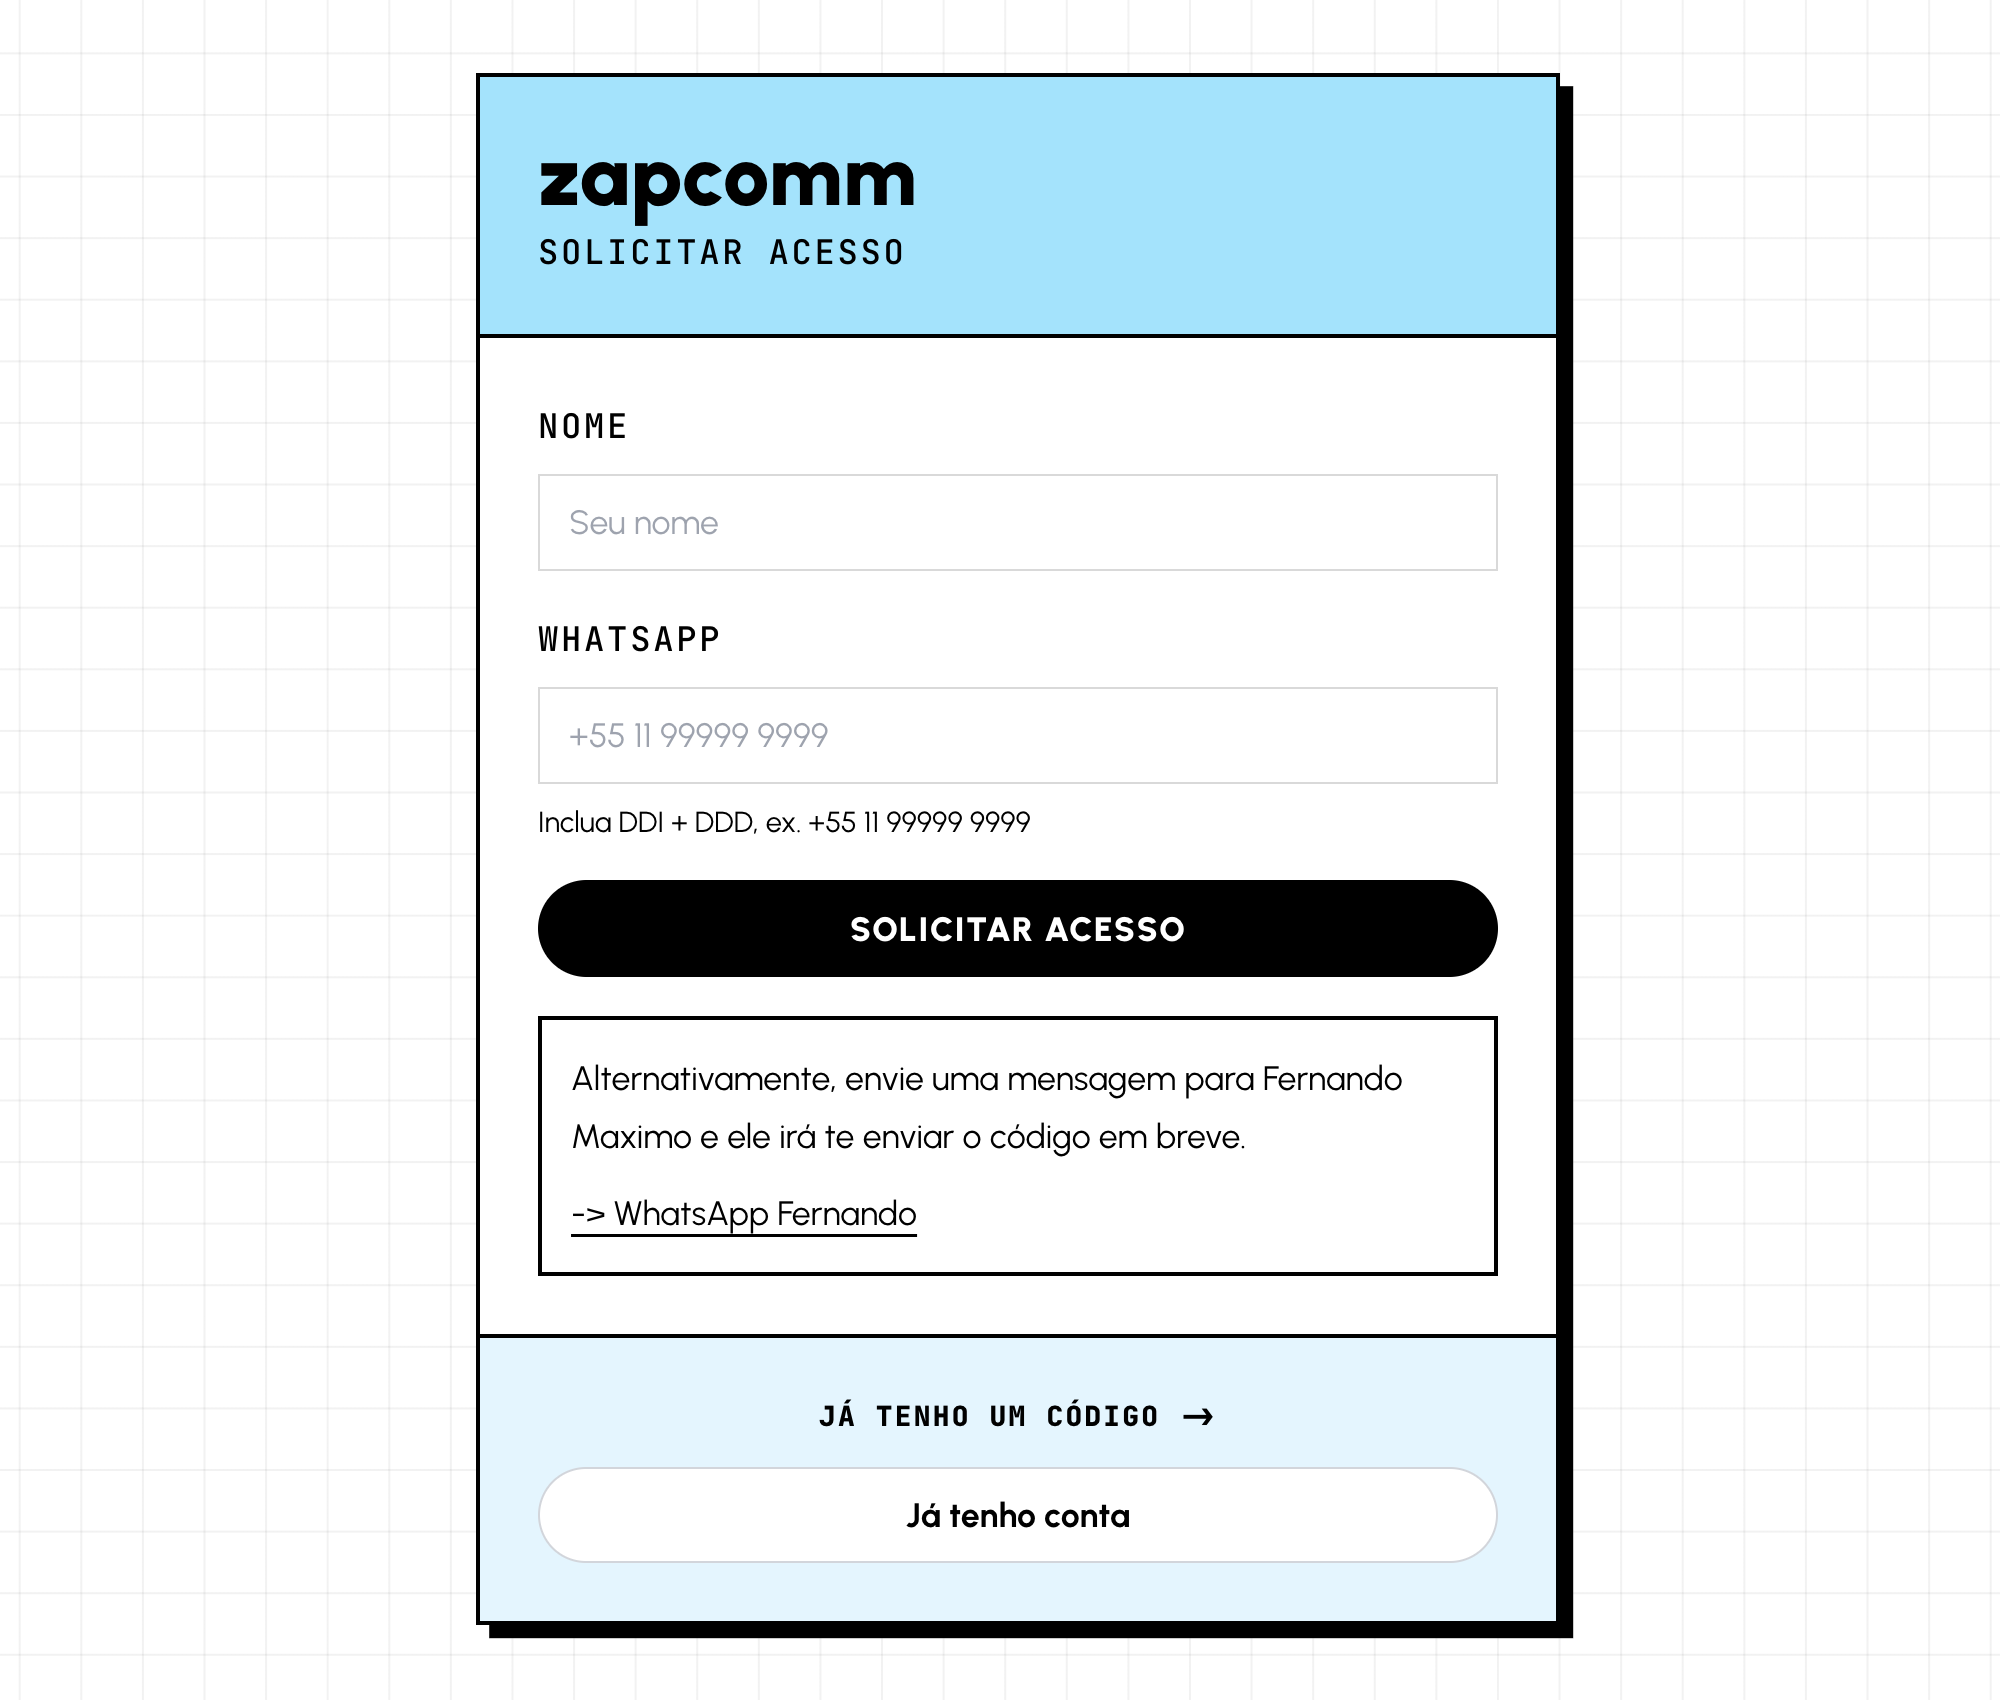
1. Get Your Invitation Code
Creating a ZapComm account starts with an invitation code. To keep control of who is using the platform for now, access is still approved manually. Send a WhatsApp message to Fernando Maximo at +64 21 0820 6702 and ask for your invitation code.
You can also use the WhatsApp icon at the bottom of this page to send that message. Once you receive the code, open the signup page, enter the code, accept the terms, and create your account with email and password or Google.
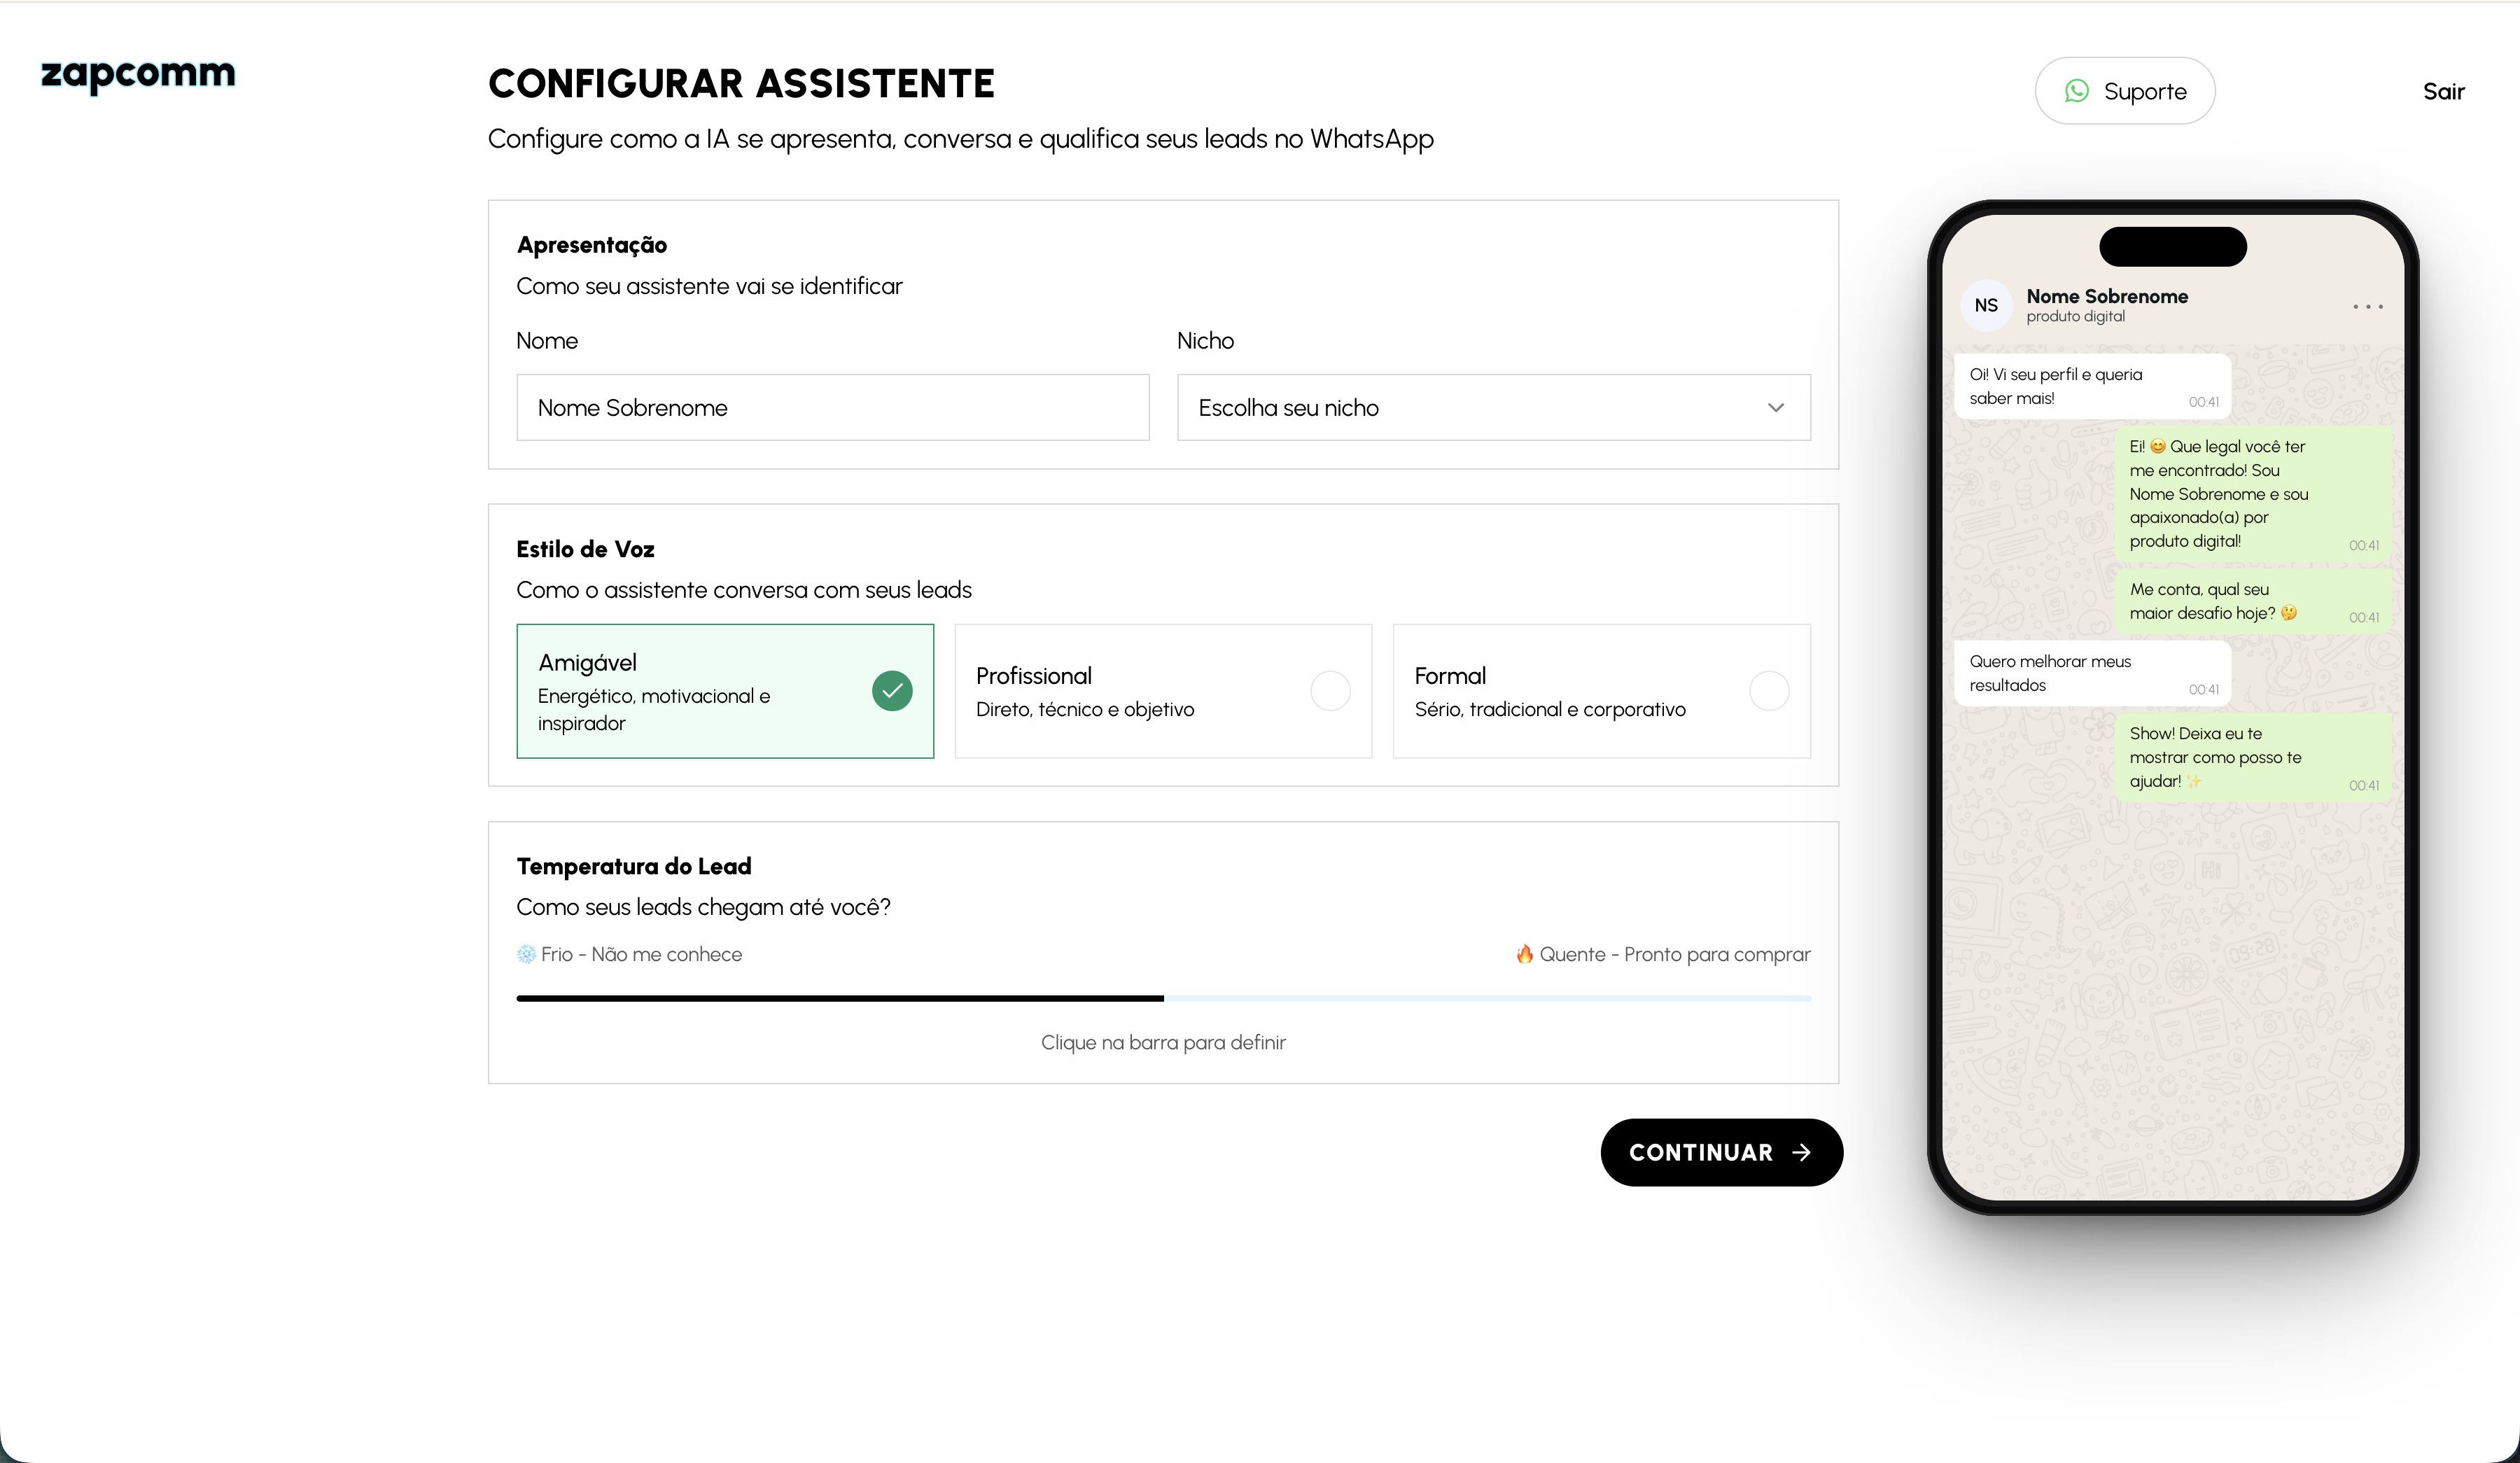
2. Set Up Your Assistant
The first onboarding step is the assistant profile. These settings tell the AI who it represents and how it should speak with your leads.
- Name: how the assistant appears and introduces itself in the conversation.
- Niche: the market you sell in, such as education, fitness, marketing, finance, or your own custom niche.
- Tone: the AI's speaking style. It can be warmer, more professional, or more consultative depending on your brand.
- Lead temperature: defines whether the conversation should educate more before the offer or move more directly toward the purchase. Cold leads need more context; hot leads are closer to the PIX.
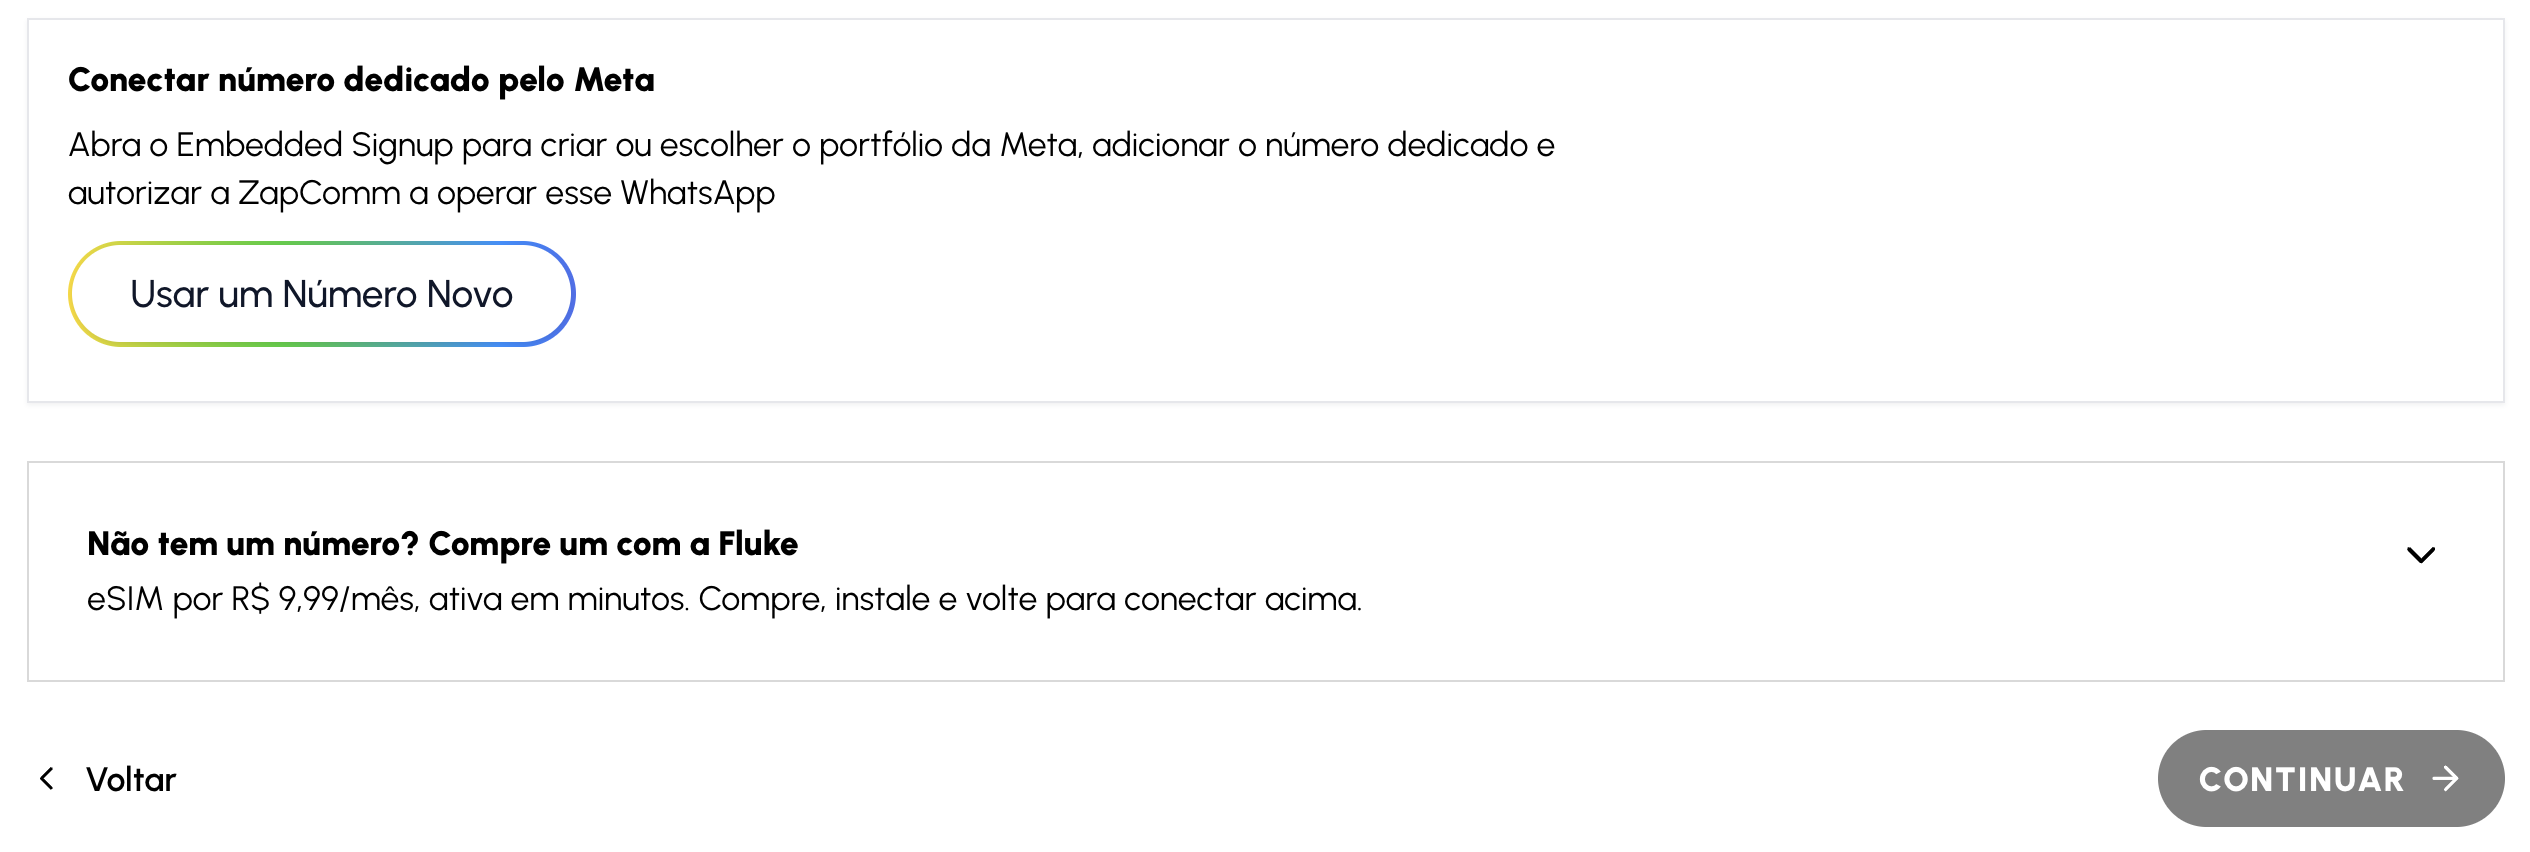
3. Connect A Dedicated WhatsApp Number
After the assistant step, choose the new number or separate number option. ZapComm opens Meta Embedded Signup so you can connect a dedicated number inside your own Meta business portfolio. This is the same business environment you can use now or later for campaigns, assets, and Meta permissions.
Inside the Meta window, always choose Add a new number. Enter a new number that is separate from the creator's personal or main WhatsApp number. This should be a dedicated line for ZapComm, such as a new SIM or eSIM. Meta will send a code by SMS or voice call; enter the code to confirm the connection.
When Meta finishes verification, return to ZapComm and continue. If the page still shows a verification step, complete the SMS, voice call, or PIN step before moving on.
4. Configure Your PIX Key
The next step is adding the PIX key that will receive your payouts. Choose the key type, enter the key twice, and save it. Check it carefully before continuing because this key is used for ZapComm payouts.
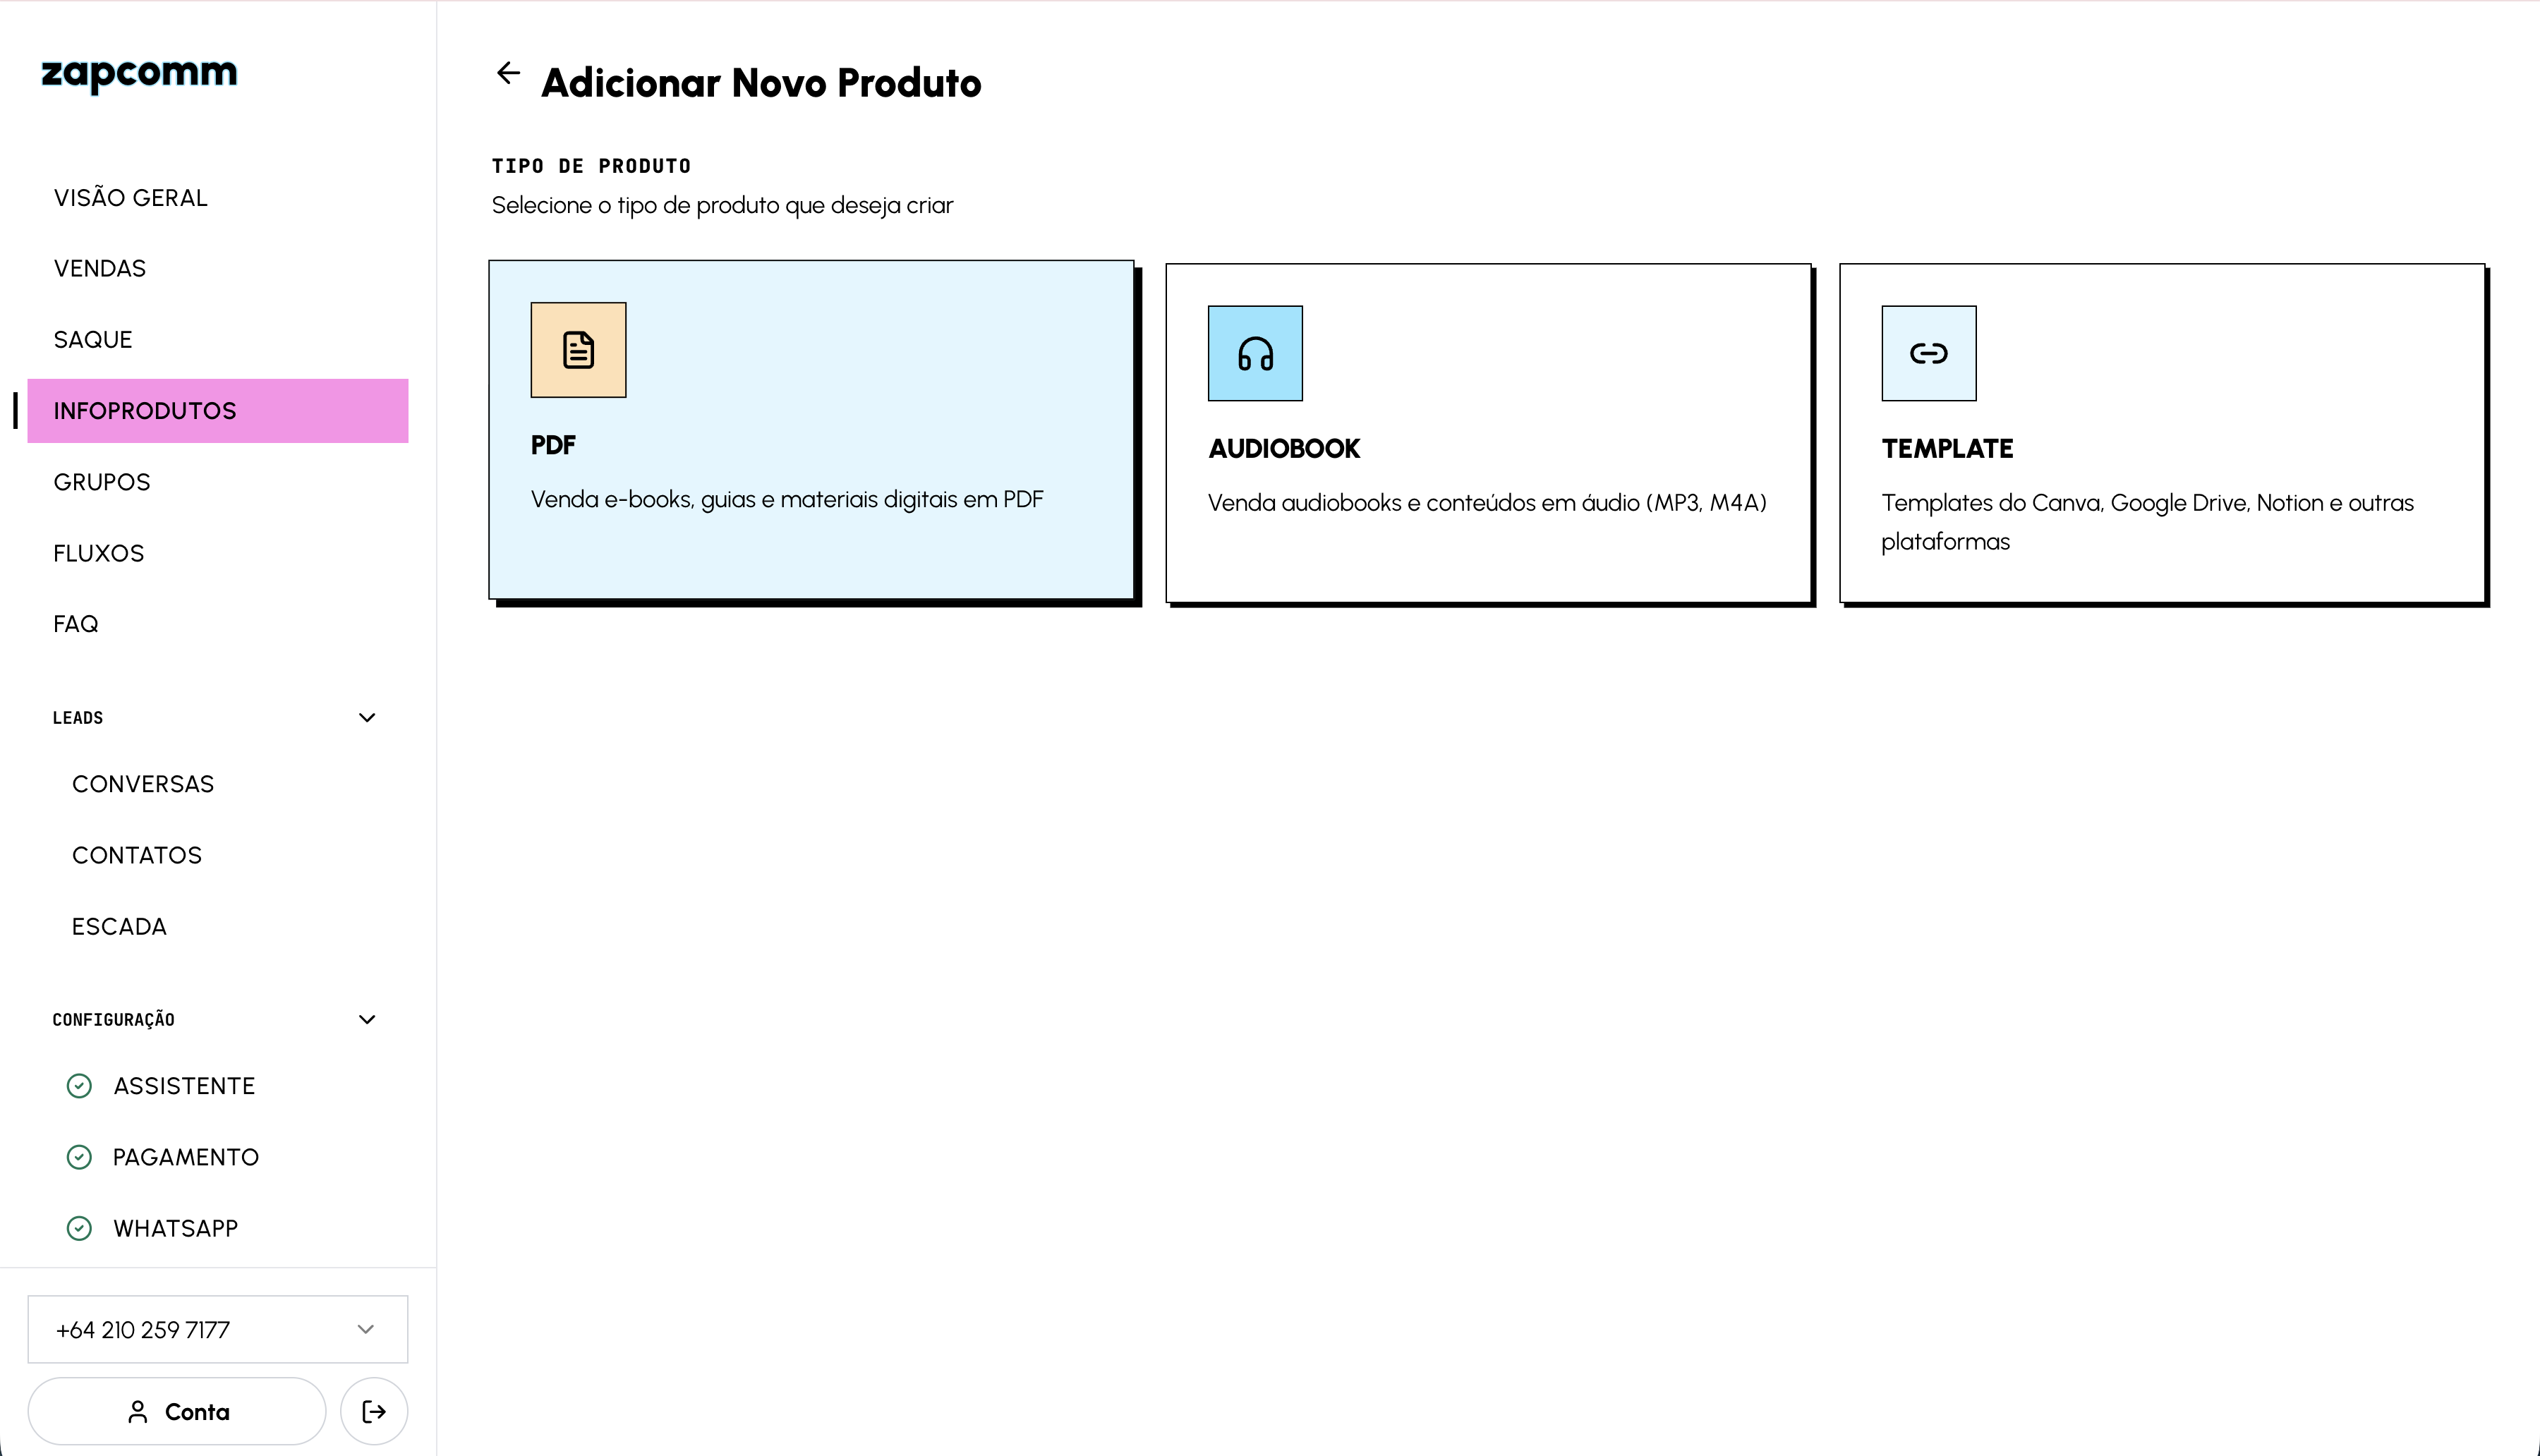
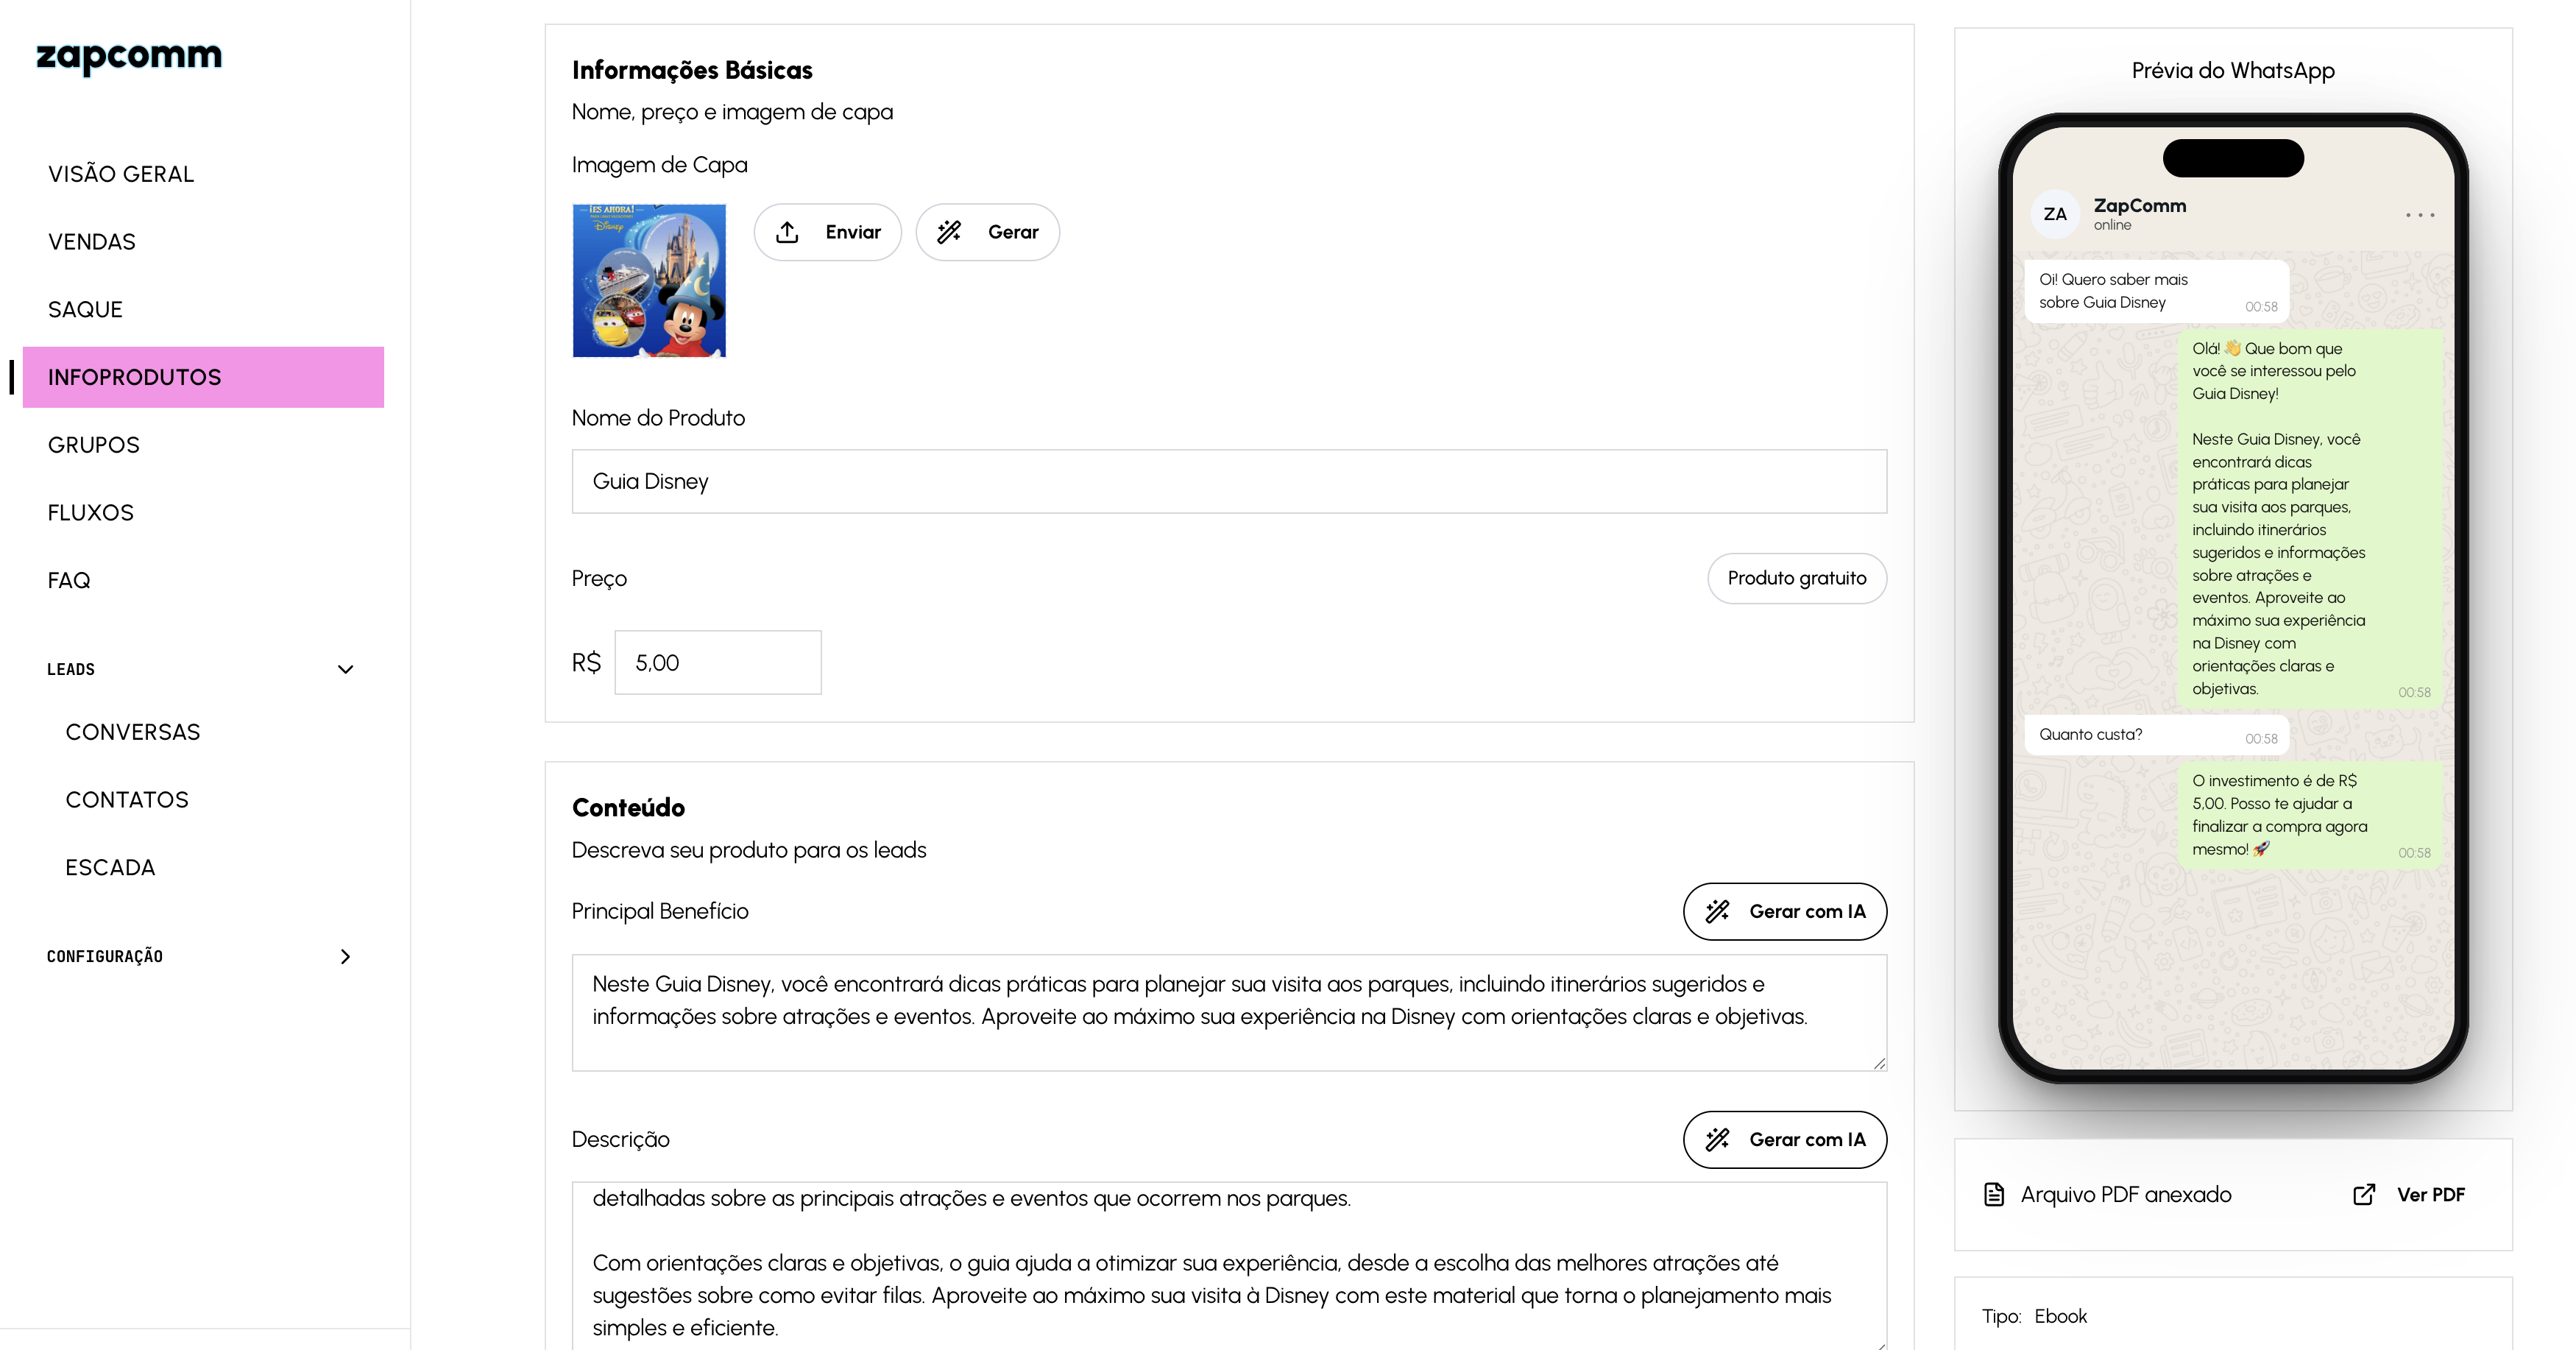
5. Choose Your First Product Type
With WhatsApp and PIX ready, open the portal and create your first product. For a PDF, choose the ebook or guide option. You can also create audiobooks and templates when that is the format of your offer.
6. Upload The File And Fill The Offer
After choosing the type, upload the file and wait for the analysis to finish. Review the name, price, cover image, main benefit, and description before publishing the product.
Use the AI button to generate or improve the description. Then configure Instagram Auto DM keywords. These are the trigger words people comment on a post or reel, such as guide, ebook, or template. ZapComm uses the keyword to send the right DM and bring the person to WhatsApp with context.
7. Review The WhatsApp Preview
The preview shows how the AI will present the product on WhatsApp. Check that the name, price, cover, and explanation are clear before sending traffic to this offer.
8. Configure Instagram
Instagram does not block dashboard access, but it must be configured for comments, DMs, and Auto DM to work. Because we are still controlling access to make sure each account is set up correctly, send your Instagram identifier to Fernando Maximo on WhatsApp: +64 21 0820 6702.
You can also tap the WhatsApp icon at the bottom of this page and send a message saying you need to enable Instagram on ZapComm. After approval, you can connect the Business or Creator account in the portal.
Once connected, ZapComm can reply publicly to comments, send the automatic DM, and route the lead to WhatsApp with the product message they asked for.
9. Use Conversations, Take Over Support, And Test The Flow
The Conversations tab is where you track everything that arrives through WhatsApp and, once Instagram is connected, leads that came from comments, reels, stories, or DMs. The list shows contact name, phone, message count, lead stage, conversation control, and last message.
- Channel icons: WhatsApp and Instagram appear together when someone commented on Instagram, received the DM, and then reached WhatsApp.
- Instagram: when available, ZapComm shows the account @handle and the post, reel, or media ID that originated the lead.
- Stage: shows the current funnel stage, such as Lead, Info (Paid), or Group, so you can filter and prioritize.
- Control: shows whether the conversation is handled by AI or by a human.
Click a conversation to see the history, reply manually, send a product or group card, and open the contact journey. This is the right place to confirm whether the AI delivered the product, whether PIX was created, and whether the lead needs human help.
Inside the individual conversation, use Take over conversation when you want to pause the AI and reply as a human. This is useful when the lead asks a sensitive question, when you want to negotiate, when there is a payment issue, or when the person needs specific support.
- Take over conversation: switches control to human and unlocks the field for manual messages.
- Send product or group: lets you send a product card, invite, or next step while handling the lead.
- Release back to AI: when you are done, release the conversation so the AI can continue the automated flow.
- 24-hour window: if the WhatsApp window is closed, the portal may require re-engagement before sending a new free-form message.
Use this as a safety brake: the AI handles volume, but you step into conversations with higher opportunity, complex questions, or risk of losing the sale.
Before publishing the trigger to your audience, run an end-to-end test with an account and phone number that are not the same ones connected as the creator. Instagram ignores comments made by the connected creator account, so use a test account or ask someone else to comment.
- Test through Instagram: publish or use a post/reel, comment a configured product keyword, and check whether ZapComm sends the public reply and DM.
- Test the link: open the DM, tap the WhatsApp link, and send the prefilled message. It should arrive with the ZapComm tracking code.
- Check Conversations: open the Conversations tab and confirm the contact appears with WhatsApp, Instagram, account handle, and post origin when available.
- Test FAQ: ask a simple question about guarantee, access, or delivery time and verify that the AI answers from your FAQ.
- Test human control: open the conversation, click Take over conversation, send a manual reply, then release it back to AI.
- Test delivery: for a free product, confirm the access card arrives. For a paid product, confirm PIX is created and the sale appears under Sales after payment.
When this test passes, the flow is ready for real traffic: Instagram comment, automatic DM, WhatsApp with context, AI reply, payment or delivery, and dashboard tracking.
10. Create FAQ Answers So The AI Can Respond Better
After testing, open FAQ in the sidebar and add the quick questions that appear repeatedly in your conversations. This knowledge base helps the AI answer simple questions without guessing and without waiting for you.
- Question: write it the way a lead would ask, such as "how do I receive the material?", "is there a guarantee?", or "is this for beginners?".
- Answer: write a short, direct answer that matches what you want the AI to say.
- Related product: when the question is about a specific product, make that clear in the answer to avoid mixing offers.
- Update loop: review the FAQ whenever you notice a repeated question in the Conversations tab.
Use FAQ entries for access policy, delivery timing, guarantees, who the product is for, payment methods, private groups, support, and next steps after purchase.
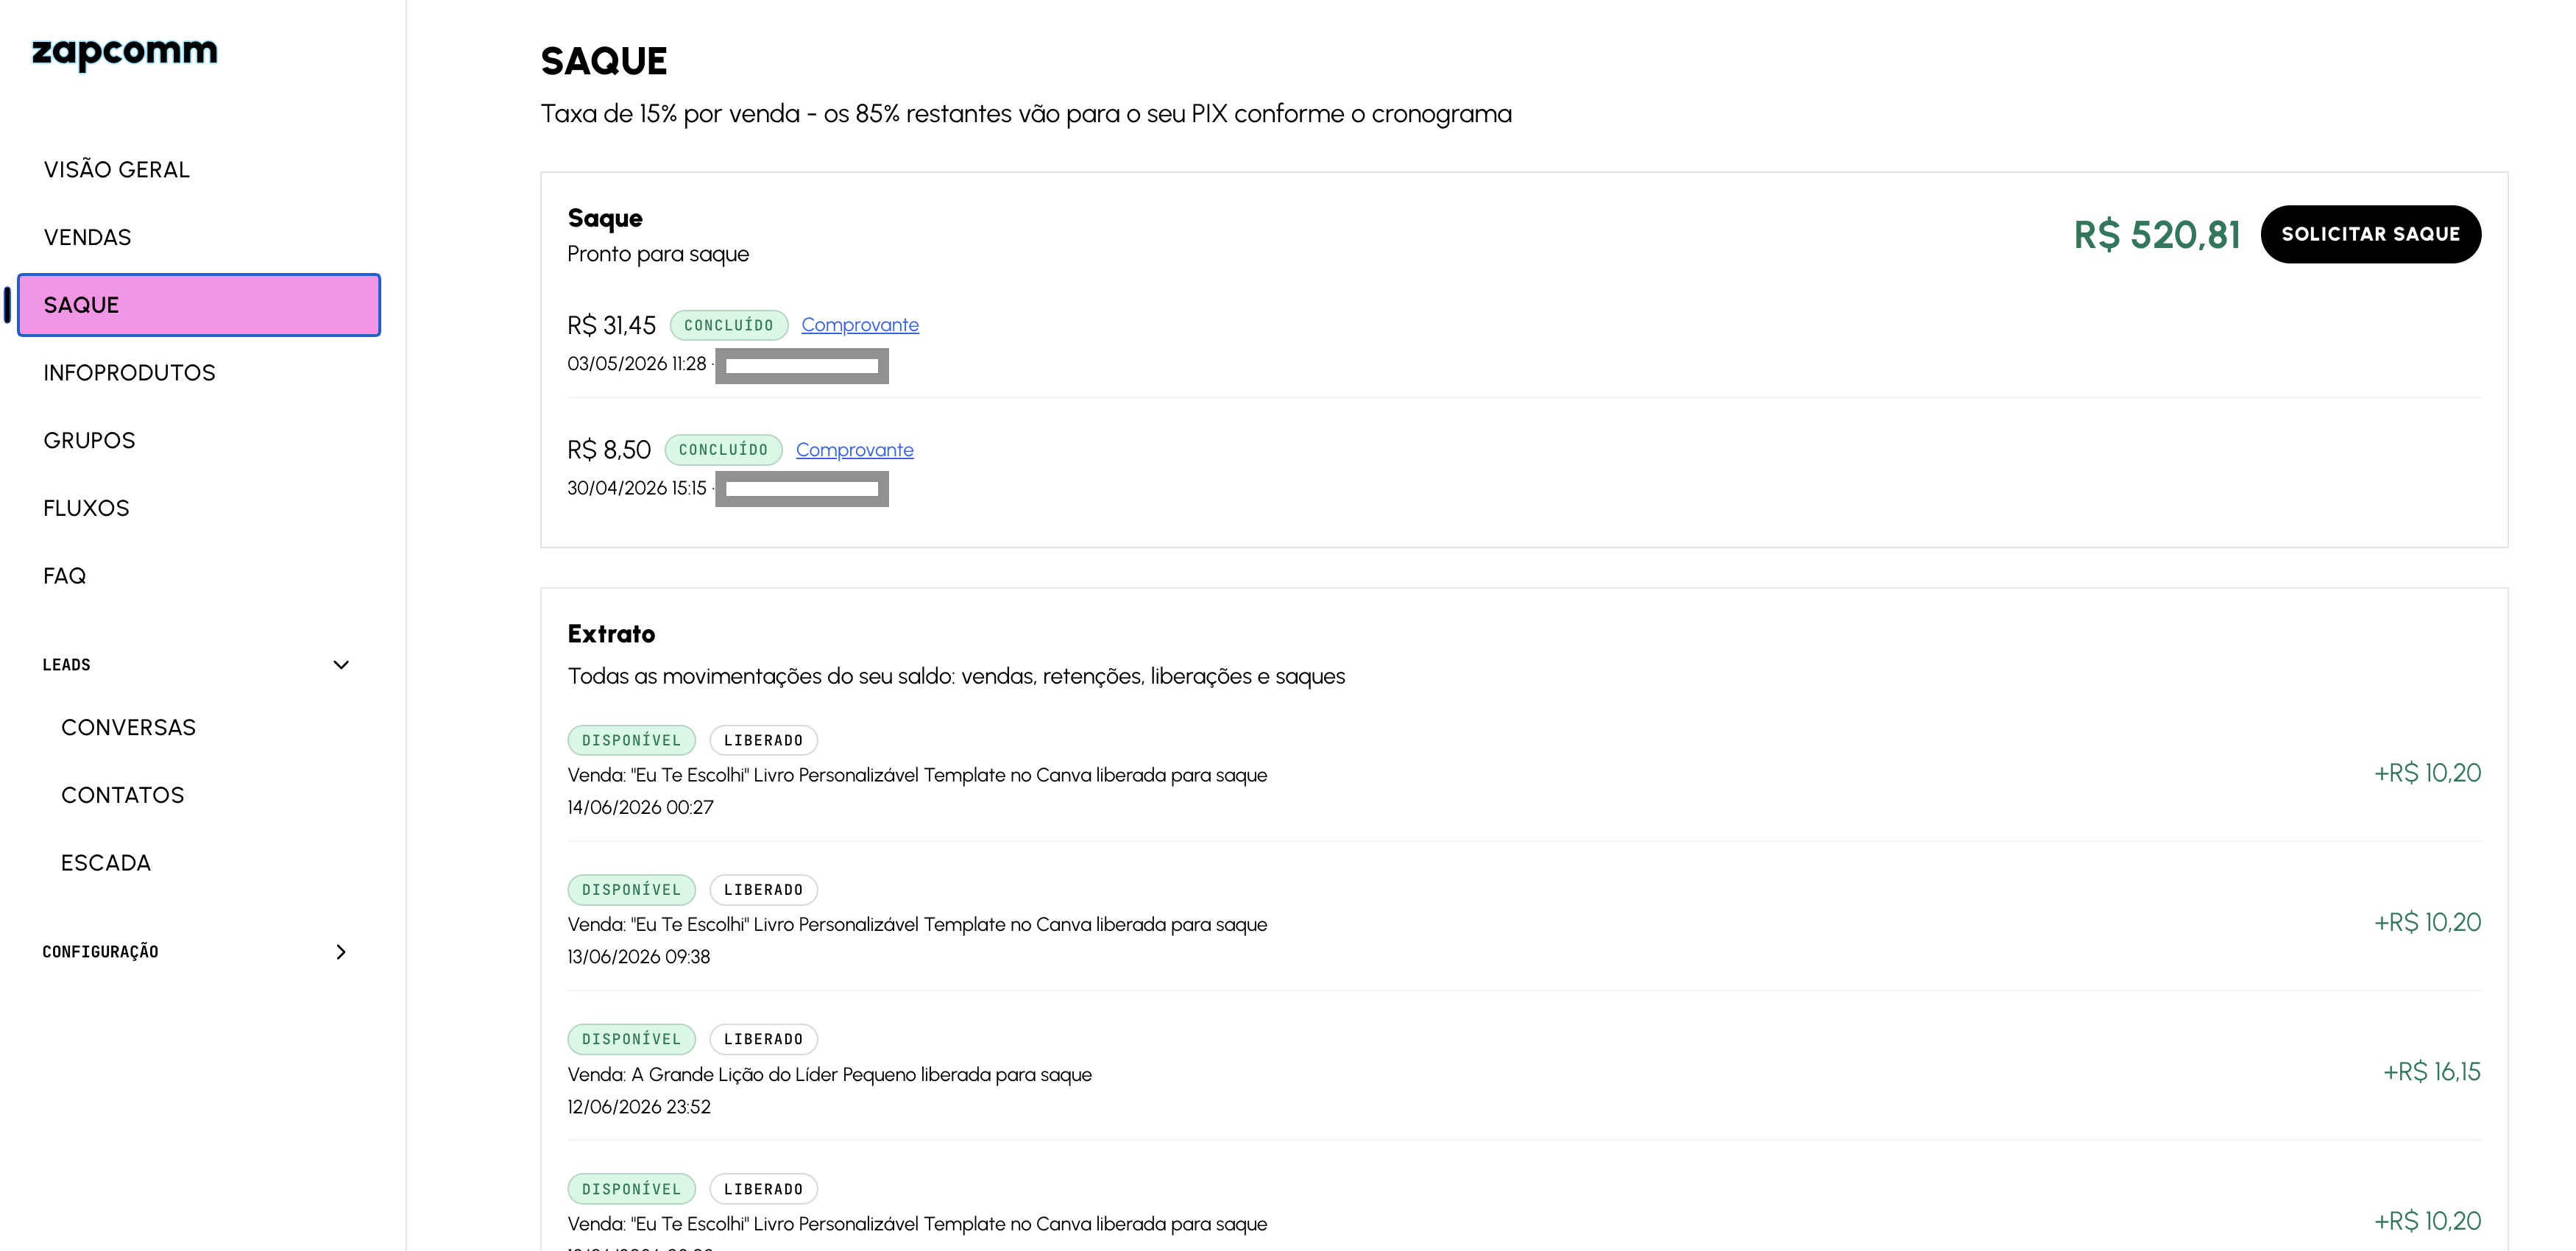
11. Track Sales And Request Payouts
Sales appear in the dashboard under Sales, with buyer, product, amount, payment status, and date. Financial activity appears under Payouts, with available balance, pending balance, payout requests, and the ledger.
Balance is not available all at once. Sales first enter pending balance. The first R$ 500 sold each day becomes available in about 30 minutes. Anything above that daily limit becomes available in up to 48 hours. When balance is available and above the minimum shown in the portal, you can request a payout to the saved PIX key.
12. Sell Access To A Private Group
Besides PDFs, templates, and single classes, you can also sell access to a private group. First create the group in WhatsApp. Then, in ZapComm, open Groups, choose Configure Access, paste the group invite link, and define name, description, price, and capacity.
ZapComm does not create or modify the group inside WhatsApp. It organizes the sale, records who bought, and sends the invite link after payment or confirmed interest, depending on your setup.
Final Checklist
- Invitation code used and account created.
- Assistant configured with name, niche, tone, and lead temperature.
- Dedicated number connected through Meta Embedded Signup.
- PIX key saved for payouts.
- First product created with price, description, and keywords.
- Instagram ID sent to the ZapComm team and connection activated when enabled.
- Test completed with another Instagram account and another WhatsApp phone.
- Conversations tab checked, including take over and release back to AI.
- FAQ created with the quick questions the AI should answer.
- Sales tracked in Sales and payouts tracked in Payouts.